
Welcome to the Mastering AutoCAD Series — The Homes Lab's complete step-by-step guide taking you from absolute beginner to confident professional. Each part builds on the last. Whether you are an architecture student, an engineer, a draughtsman, or a self-learner, this series is built for you. Bookmark it, follow along, and share it with someone who needs it.
There is a moment every AutoCAD beginner experiences — usually alone, staring at a blank white canvas with a blinking crosshair — when the software feels completely alien. The menus are unfamiliar. The command line is cryptic. Nothing behaves the way you expected.
That feeling does not last long — if you start with the right foundation.
AutoCAD is not difficult. But it does demand a different way of thinking. It is not a drawing tool in the traditional sense. It is a precision language for describing physical things. Once you understand that, everything else falls into place.
This first article does not jump straight into commands and shortcuts. Instead, we build the intellectual groundwork — what AutoCAD actually is, how it thinks, what its environment looks like, and why it works the way it does. Get this right, and every part that follows will feel like a natural progression rather than a disconnected trick.
Let us begin.
ðŸ-Šï¸ What Is AutoCAD — Really?
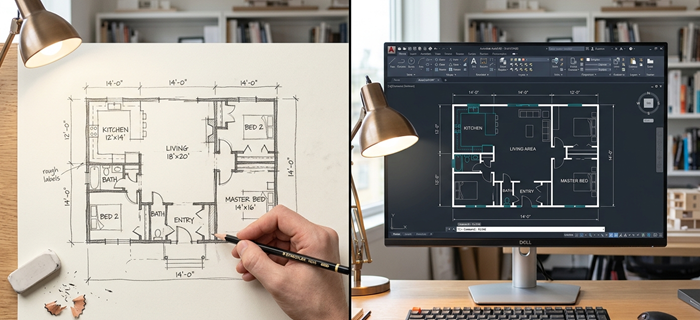
When you draw a line on paper, you are making a mark. When you draw a line in AutoCAD, you are creating a mathematical object — defined by a precise start point, an angle, and a length. That object can be edited, measured, scaled, and reproduced with perfect accuracy at any time.
This is the foundation of everything. AutoCAD does not store pictures. It stores data — and that data describes real, measurable geometry.
💡 Why this matters: Because a building contractor, a manufacturer, or a structural engineer does not need a picture of your design. They need exact numbers. AutoCAD gives them exactly that — embedded in every line, arc, and dimension you place.
This model-centric philosophy is what makes AutoCAD the industry standard across architecture, engineering, construction, manufacturing, and urban planning. The file is not a drawing of the thing — it is the thing, expressed in numbers.
📠Vector Drafting vs. Raster Images — Understanding the Difference
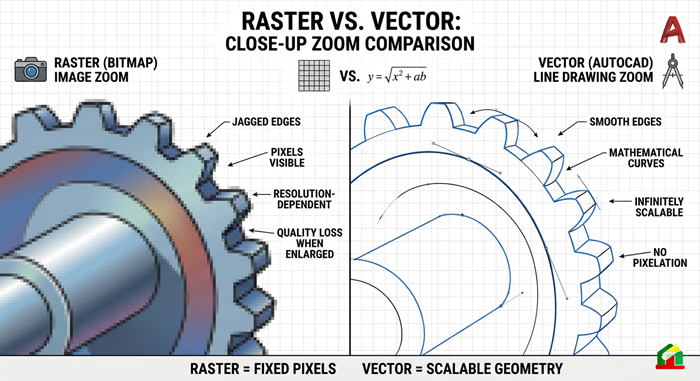
To truly understand AutoCAD, you need to understand the difference between vector graphics and raster images — because AutoCAD is entirely vector-based.
Raster images — photographs, scanned sketches, JPEGs — are made up of thousands of tiny coloured squares called pixels. When you zoom in, those squares become visible and the image looks blurry. The information is fixed. You cannot tell a raster image that a wall is 4,500mm long — it simply does not know.
Vector graphics — the kind AutoCAD creates — are mathematical. Every line, circle, and curve is stored as a formula. When you zoom in, the software recalculates and redraws the geometry with perfect sharpness at any scale. A dimension attached to a line reflects the actual real-world measurement — dynamically and always accurately.
| Raster Image | AutoCAD Vector Drawing | |
|---|---|---|
| Zoom quality | Blurry at high zoom | Perfectly sharp at any zoom |
| Contains measurements? | No | Yes — always accurate |
| Editable geometry? | No | Fully editable at any time |
| Scalable for print? | Limited | Perfectly scalable |
| Used for construction? | Never | Always |
âš ï¸ NB: This is why you can never simply scan a hand-drawn plan and submit it for construction approval. A scanned image contains no real data — only pixels. An AutoCAD drawing contains the actual geometry, measurements, and annotations that contractors and authorities require.
🌠The Two Spaces: Model Space and Paper Space
This is one of the most important concepts in AutoCAD — and one that confuses beginners more than almost anything else. AutoCAD has two distinct working environments, and understanding the difference between them changes everything.
Model Space — Where You Draw
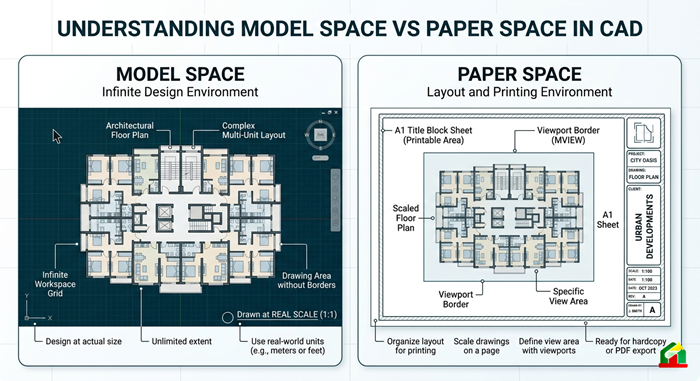
When you open a new drawing, you land in Model Space. Think of it as an infinite, limitless canvas that exists in real-world scale.
Everything you design lives here — walls, beams, roads, floor plans, mechanical parts — drawn at their actual real-world size. A door that is 900mm wide is drawn as exactly 900mm. A plot of land that is 50 metres long is drawn as exactly 50 metres. There are no scale conversions. No mental calculations. Just reality, represented digitally.
💡 Tip: Always draw in Model Space at a 1:1 scale — meaning real-world size. Never shrink your drawing to fit a page while still in Model Space. That is what Paper Space is for.
Paper Space — Where You Present
Paper Space is accessed through the Layout tabs at the bottom of your screen. This is where your drawing gets prepared for printing or presentation.
In Paper Space, you create a sheet of a specific size — A1, A2, A3, A4 — and place viewports onto it. A viewport is essentially a framed window that looks into your Model Space from a chosen angle and at a chosen scale. You set the viewport to 1:100, or 1:50, or 1:20 — whatever suits your sheet — and the drawing inside scales accordingly.
Your title block, sheet border, project information, general notes, and revision tables all live in Paper Space. The model itself is never touched by any of this.
âš ï¸ NB: This separation between Model Space and Paper Space is one of AutoCAD's most powerful organizing principles. Many beginners skip Paper Space entirely and just print directly from Model Space — and their drawings always look unprofessional as a result. We will cover Paper Space and layouts in full detail in a later part of this series.
ðŸ-¥ï¸ Surveying the AutoCAD Interface
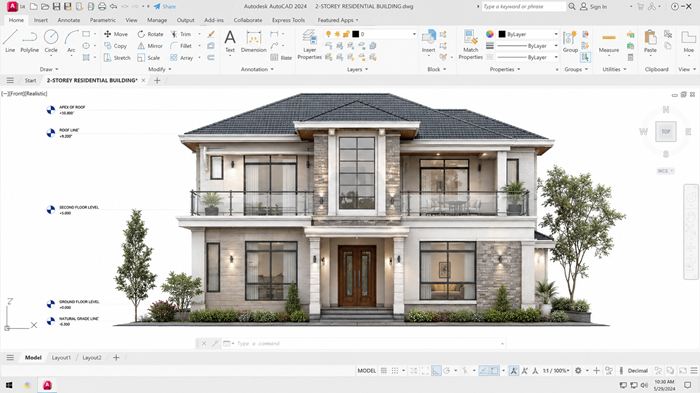
Before you touch a single command, get familiar with your environment. Here is a guided tour of the AutoCAD workspace — every element labeled and explained.
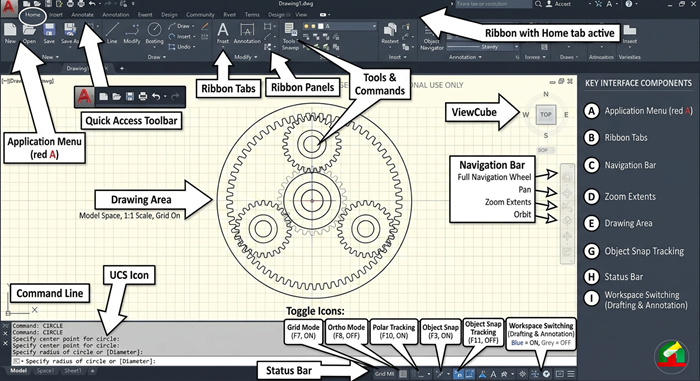
1. The Application Menu (The Red "A")
Located at the very top-left of the screen, the large red "A" icon opens the Application Menu. This is your file command centre — New, Open, Save, Save As, Export, Print, and Close all live here. Think of it as the equivalent of "File" in other software, but more powerful.
2. The Quick Access Toolbar
Sitting right beside the Application Menu is a small row of icons — Save, Undo, Redo, Open, New, and Print. These stay visible no matter which Ribbon tab you are on. You can customise this toolbar to add your most-used commands for faster access.
💡 Tip: Add the LAYER command to your Quick Access Toolbar early on. You will use it constantly, and having it always visible saves significant time.
3. The Ribbon
The Ribbon is the wide panel of tools running across the top of the screen. It is organized into tabs — Home, Insert, Annotate, Parametric, View, Manage, and more. Each tab contains panels grouping related commands.
The Home tab is where you will spend most of your time as a beginner. It contains your primary drawing tools (Line, Circle, Arc, Rectangle), your editing tools (Move, Copy, Trim, Offset), and your layer controls.
âš ï¸ NB: The Ribbon changes contextually. When you select certain objects, new tabs appear automatically — for example, selecting a block will reveal a Block Editor tab. Do not be alarmed when tabs appear or disappear — AutoCAD is simply showing you what is relevant to your current selection.
4. The Drawing Area
This is the large dark or white canvas that takes up most of your screen — your window into Model Space. The crosshair cursor moves freely across it, and the small square at its centre is the aperture — the snapping target that locks onto precise geometric points.
We will explore snapping and precision in detail in Part 2 of this series.
5. The Command Line — The Most Important Element
At the bottom of the Drawing Area sits a narrow bar that many beginners completely ignore — and that is their biggest mistake. The Command Line is arguably the most important part of the AutoCAD interface.
Every action you take in AutoCAD generates a text prompt here. The Command Line tells you:
- What command is currently active
- What input the software is waiting for
- What options are available
- What you just did
Even when you click Ribbon buttons, the Command Line echoes the action and waits for your next input. Seasoned AutoCAD users read the Command Line constantly — it is a running commentary on everything happening in the drawing session.
âš ï¸ NB: If AutoCAD ever seems to stop responding or behave strangely, the first place to look is the Command Line. Nine times out of ten, a command is waiting for input or an Escape (ESC) key press to cancel it.
6. The Status Bar
Running along the very bottom of the screen is the Status Bar — a row of small toggle icons that quietly govern the accuracy of everything you do. Key toggles include:
| Toggle | What It Does |
|---|---|
| Grid | Shows a reference dot or line grid in the drawing area |
| Snap | Locks the cursor to grid intervals |
| Ortho | Restricts cursor movement to perfectly horizontal or vertical |
| Polar Tracking | Guides the cursor along set angular increments |
| Object Snap (OSNAP) | Snaps the cursor to specific points on existing geometry |
| Dynamic Input | Shows coordinate input boxes directly at the cursor |
💡 Tip: Learn the keyboard shortcuts for these toggles early. F8 turns Ortho on and off. F3 toggles Object Snap. These two alone will be your most-used keys in the early stages of learning.
📠Units, Coordinates, and Setting Up Your Drawing
Precision begins before you draw a single line. The very first thing to configure in any new drawing is your units — and getting this wrong causes problems that can be very difficult to fix later.
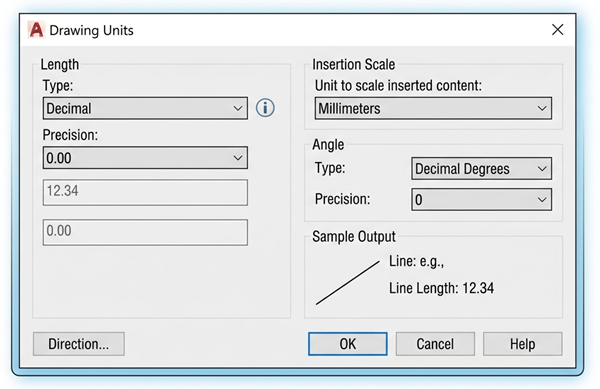
Setting Your Units
Type UNITS in the Command Line and press Enter. A dialog box opens where you set:
- Length Type — Decimal (most common for metric), Architectural (for feet and inches), Engineering, or Fractional
- Precision — how many decimal places are displayed (0.00 for millimetres is standard in most architectural work)
- Insertion Scale — the base unit of your drawing (millimetres, metres, inches, etc.)
âš ï¸ NB: The insertion scale is critical when combining files from different sources. If one file is set to millimetres and another to metres, combining them will cause one drawing to appear 1,000 times larger or smaller than the other. Always confirm units before beginning any drawing — and always confirm before importing external files.
The Coordinate System — Three Ways to Place a Point
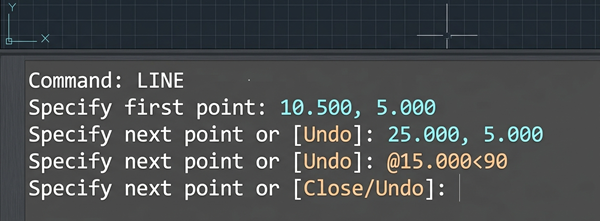
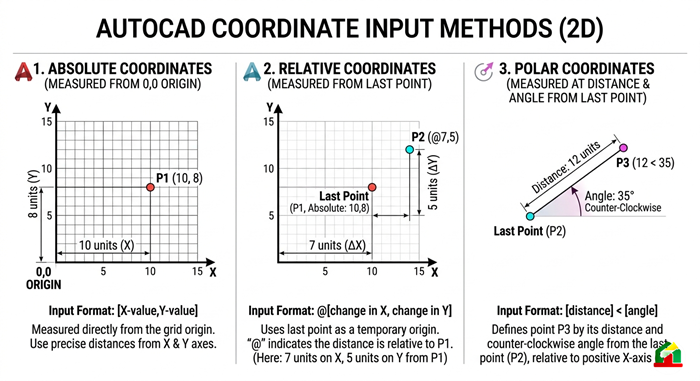
AutoCAD's coordinate system is elegantly simple once understood. The World Coordinate System (WCS) places the origin point at 0,0 — the intersection of the X axis (horizontal) and Y axis (vertical). Every point in your drawing is measured from this origin.
You have three ways to define any point:
1. Absolute Coordinates Measured from the fixed origin point. You type the exact X and Y values separated by a comma.
Example:
500,200places a point exactly 500 units right and 200 units up from the origin.
2. Relative Coordinates Measured from the last point you placed, not from the origin. You use the @ symbol before the values.
Example:
@500,0moves 500 units to the right of wherever your last point was.
3. Polar Coordinates Defines a point by distance and angle from the last point. The format is @distance<angle.
Example:
@400<30places the next point 400 units away at a 30-degree angle from the last point.
💡 Tip: For most everyday drafting, you will use Relative Coordinates the most. Once you understand the @ symbol, drawing walls, partitions, and structural elements becomes fast and intuitive. We practise all three methods hands-on in Part 2 of this series.
ðŸ-±ï¸ Navigating the Canvas — Zoom, Pan, and Finding Your Way
Model Space is infinite. That means navigation is a skill you will use every single session — and the good news is that AutoCAD makes it very intuitive once you know the basics.
The Mouse Wheel is your best friend:
| Action | Result |
|---|---|
| Scroll wheel forward | Zoom in toward cursor |
| Scroll wheel backward | Zoom out away from cursor |
| Hold wheel + drag | Pan the view in any direction |
| Double-click wheel | Zoom Extents — fits everything on screen |
âš ï¸ NB: The double-click zoom (Zoom Extents) is one of the most useful commands you will ever use. If you ever scroll too far and lose your drawing — your canvas appears blank — simply double-click the mouse wheel and AutoCAD will pull back to show everything you have drawn. This has rescued countless beginners from panic.
Additional Navigation Tools:
- Zoom Window — type
ZthenWin the Command Line, then draw a box around the area you want to zoom into - Zoom Previous — type
ZthenPto return to your last view - ViewCube — the 3D orientation cube in the top-right corner; for 2D work, clicking "Top" ensures you are always looking straight down at your drawing correctly
💡 Tip: Develop the habit of navigating with the mouse wheel from day one. Users who rely on the Zoom buttons in the Ribbon are always slower than those who navigate by feel with the wheel. Speed in AutoCAD is largely a navigation skill.

💾 File Formats and Saving Your Work
Understanding AutoCAD's file types protects your work and ensures compatibility with colleagues and clients.
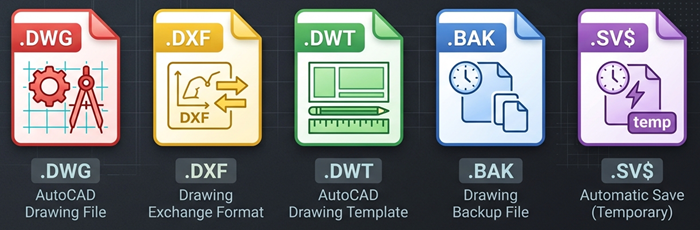
| File Extension | What It Is |
|---|---|
| .DWG | The primary AutoCAD drawing file — always your main working format |
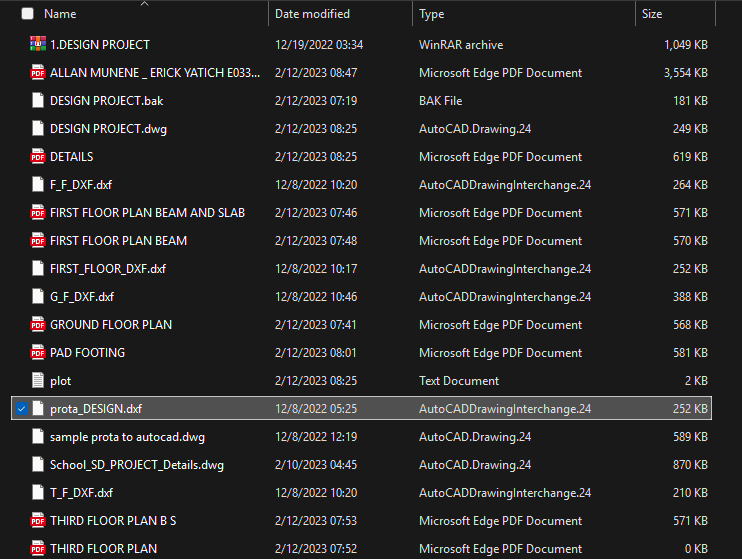
| .DXF | Drawing Exchange Format — for sharing with other CAD software |
| .DWT | Drawing Template — stores standard settings for reuse |
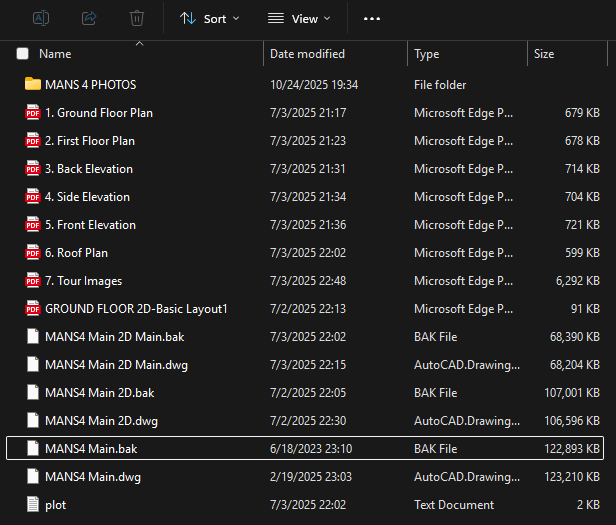
| .BAK | Automatic backup of the previous save — stored in the same folder |
| .SV$ | Auto-save file — written at a configurable time interval |
âš ï¸ NB: The .BAK file is your silent safety net. Every time you save, AutoCAD renames your previous version to .BAK before writing the new one. If your current file becomes corrupted, rename the .BAK file to .DWG and you recover your previous session. Know where your files are saved — this knowledge has saved entire projects.
💡 Tip: Set your auto-save interval to every 10 minutes when starting out. Go to Options → Open and Save → Automatic Save and set the minutes value. As you grow in confidence, you will develop a habit of saving manually with Ctrl+S constantly — but the auto-save is your fallback net.
🧠The Right Mindset for Learning AutoCAD
Before we close Part 1, there is one more thing to establish — and it is perhaps the most valuable thing in this entire article.
AutoCAD rewards a specific mindset. Here is what that looks like:
Think in real-world measurements, always. Never think about how big something looks on screen. Think about how big it actually is. A wall is 150mm thick. A room is 4,200mm wide. Draw it at those exact dimensions, every time.
Read the Command Line constantly. Every time you feel lost or confused, look at the Command Line first. It is telling you exactly what it needs. Most beginner frustration disappears the moment they develop this habit.
Precision over speed — at first. Speed in AutoCAD comes from precision, not from rushing. Users who try to go fast before mastering accuracy spend more time fixing mistakes than drawing. Slow down, enter exact values, confirm every point.
Everything is editable. Nothing you draw in AutoCAD is permanent. Every line can be moved, stretched, deleted, or redesigned. This is not paper. Embrace iteration without fear.
Commands are your vocabulary. AutoCAD has a full keyboard command for everything. Learning to type commands directly — rather than always hunting through the Ribbon — is what separates a slow user from a fast one. We will build this vocabulary systematically throughout the series.
💡 Tip: At the end of every practice session, type
AUDITin the Command Line and press Enter. This command checks your drawing file for errors and fixes them automatically. It is a professional habit that keeps your files clean and stable over time.
🚀 Final Thoughts
AutoCAD is one of the most valuable technical skills in the construction, design, and engineering world — and it is far more learnable than most people assume. The professionals who use it daily did not start knowing any of it. They started exactly where you are now.
The difference between those who master it and those who give up is simple: the ones who master it understood the foundations first.
You now have those foundations. The canvas is no longer blank — it is a precision environment waiting for your geometry.
Follow this series on The Homes Lab Community and never miss a new part. Share it with a colleague, a student, or anyone in architecture, engineering, or construction who wants to level up their skills.